lesson 03 - board exploration, switch and buttons
posted: Wed, Jun 14, 2023 |
tagged: projects | dev | electronics | fec
return to project home | resources
Code and reference Fritzing diagrams
part 1 - exploring the Pico board
Let's explore our board a bit.
- Connect your Pico to your computer via USB
- Open your
Mucode editor - Click on the Serial button on the top menu to open the serial monitor
- Press
CTRL + Cto interrupt the execution of the code - Press
Enterto access the REPL (Read -Evaluate -Print -Loop) - Enter the command
import boardand press enter - Enter the command
help(board)and press enter - Review the output of the command to see the built-in components on your Pico board
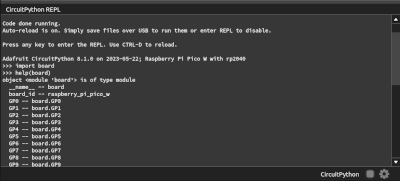
The Pico doesn't have a bunch of addressable ancillary hardware components, as illustrated by the output. Other boards, such as the Circuit Playground Express from Adafruit is a prime example of a board with several components on-board such as an accelerometer, microphone, speaker, 10 neopixels, and more.
part 2 - let's get this switched on (and off)
Before connecting more electronics to the breadboard and the Pico, first disconnect the USB cable. To get you familiarized with the Pico a bit more intimately, we'll have you reference the pinouts to make the connections with slightly more sparse instructions.
references
how does a switch work?
A switch is a very simple component, and in a single throw single position switch, you either have a connection or you don't. Think of the power switch for the light in your bedroom. When the light is off, the switch is considered open and the connection between the power source and the light is severed. When you close down / turn on the switch, the connection is established between the source and the bulb.
approach
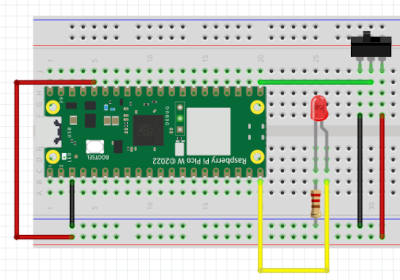
- We'll use the slide switch from our kit as a digital input
- When the switch connection is made, a connected LED will illuminate
- When the switch connection is severed, the LED will be off
parts
- Raspberry Pi Pico W
- Solderless breadboard
- 1 x 220 ohm resistor
- 1 x red LED
- slide switch
- hookup wires
- usb cable
wiring
- Connect the 3V3 pin to a positive terminal on your breadboard
- Connect one of the GND pins to the negative terminal on your breadboard
- Connect GP15 to the Anode leg of a red LED
- Connect a 220 ohm resistor to the Cathode leg of the LED and to the ground rail
- Attach the slide switch across any three empty rows on the breadboard
- Connect the top pin to the ground rail
- Connect the middle pin to GP16
- Connect the bottom pin to the positive rail
code
# Import libraries
import board
import digitalio

# Define LED object
led = digitalio.DigitalInOut(board.GP15)
led.direction = digitalio.Direction.OUTPUT

# Define switch object
switch = digitalio.DigitalInOut(board.GP16)
switch.direction = digitalio.Direction.INPUT
switch.pull = digitalio.Pull.UP

# Loop and test for switch state
while True:
    if switch.value:
        led.value = True
    else:
        led.value = False
part 3 - push it (the button) real good
We're going to add a temporary push button into the mix. We're going to explore how the Pico reacts when a button is pressed, then incorporate it into the project above controlling a second LED.
approach
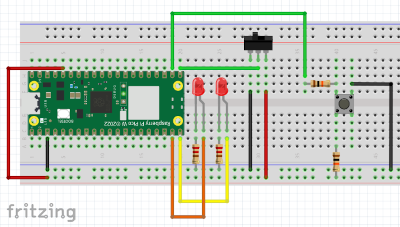
- add a temporary push button to control a second LED
additional parts
- part 2 components as wired above
- 1 x red LED
- 1 x 220 ohm resistor
- temporary push button
- 2 x 10k ohm resistors
- additional hookup wire
wiring
- part 2 wired as above
- connect the Anode of the additional LED to GP14
- connect the cathode of the additional LED to one leg of the additional 220 ohm resistor
- connect the other end of the 220 ohm resistor to the ground rail
- connect a temporary push button straddling the center divider of the breadboard
- connect a 10k ohm resistor to the positive rail and to the top left connector of the button
- connect a 10k ohm resistor to the top right connector of the button and to an open row on the breadboard
- connect the other end of the 10k ohm resistor to GP17
- connect the bottom right connector of the button to the ground rail
code
# Import libraries
import board
import digitalio
import time

# Define LED object
led = digitalio.DigitalInOut(board.GP15)
led.direction = digitalio.Direction.OUTPUT

led2 = digitalio.DigitalInOut(board.GP14)
led2.direction = digitalio.Direction.OUTPUT

# Define switch object
switch = digitalio.DigitalInOut(board.GP16)
switch.direction = digitalio.Direction.INPUT
switch.pull = digitalio.Pull.UP

# Define button object
button = digitalio.DigitalInOut(board.GP17)
button.direction = digitalio.Direction.INPUT
button.pull = digitalio.Pull.DOWN

# Loop and test for switch and button state
while True:
    if switch.value:
        led.value = True
    else:
        led.value = False

    if button.value:
        led2.value = False
    else:
        led2.value = True

    time.sleep(0.1)
part 4 - let's dig in to some python
Ok, let's dig into some Python code. Let's install IDLE (more on IDLE?), Python's Integrated Development and Learning Environment. IDLE is typically installed with Python when installing on Windows, but not Linux.
Execute the command sudo apt install idle3 -y from within your terminal. This will install IDLE, which you'll find in the Programming menu within the Ubuntu Mate desktop menu system. Open IDLE.
We'll quickly recreate the Hello World program. In IDLE, enter print("Hello World") and press enter.
Now let's review doing some math in IDLE. You can enter the highlighted commands below directly into IDLE and press enter after each example.
- Addition:
1 + 5 - Subtraction:
10 - 3 - Division:
10 / 2- Note, your answer will be a floating point number
- Multiplication:
3 * 5 - Exponentiation:
2 ** 3(2 to the 3rd power) - Remainder (Modulo):
7 % 2
And let's quickly look at a few types. Execute the following highlighted commands in IDLE:
- Integer type:
type(2) - Float type:
type(4.2) - Boolean (bool) type:
type(True) - String (str) type:
type("hello world") - String (str) type:
type("4")
String arithmetic? Let's apply some math logic to strings and see what happens in IDLE:
- String concatenation:
"Hello " + "World" - String repetition:
"Hello" * 3
homework
In support of this section of the learning, please read Chapter 1 of Think Python 2 and practice the examples in IDLE.