lesson 04 - more python, VS Code and a noise maker
posted: Wed, Jun 28, 2023 |
tagged: projects | dev | electronics | fec
return to project home | resources
Quick References
part 1 - let's explore a few additional Python concepts
Working with microcontollers to interface with the outside world via sensors or by ingesting data from the internet via an API to make decisions with requires us to understand a very important concept in Python, and that is the ability to test values, run comparisons and then build flow control into our apps. Think of flow control as a typical decision tree or flow chart diagram.
We've seen this in some of the code we've already used when we interacted with a switch to detect the state of the switch, and I'm talking about the if statement. But before we start using it, we need to understand how to make comparisons in Python. Blow are the typical comparison operators used in Python.
- Measure equality
== - Measure inequality
!= - Less than
< - Greater than
> - Less than or equal
<= - Greater than or equal
>=
Note: When we used the single
=before in declaring variables, this is known as an assignment operator. To measure equality, Python uses the distinct==operator.
The result of tests using comparison operators are the built-in reserved keywords in Python, True or False, and these are known as boolean operators. We've seen assigning a boolean value of True or False to a variable before. These comparison operators can be used in Idle to test value comaprisons of any data type such as strings, integers, booleans, floats, etc.
Often times you may want to test for the state of multiple values and only proceed when both conditions evaluate in a certain manner. To support this, Python has binary boolean operators and and or. Testing this in Idle would look something like this:
>>> True and True
True
>>> True and False
False
>>> False or True
True
>>> False or False
False
Putting this together, here is a sample code block.
a = 24
if a > 10 and a < 20:
    print("Acceptable value")
else:
    print("Unacceptable value")
What do you think the result will be? Enter the code in Idle and see if you are right.
The if else block can be extended to test for multiple conditions using elif. Here is an example extending the code block above. Give this code a run through and see what happens.
a = 24
if a > 10 and a < 20:
    print("Acceptable value")
elif a == 24:
    print("Bingo")
else:
    print("Unacceptable value")
Socratica: If, Then, Else: A quick supporting video on Python flow control
part 2 - VS Code
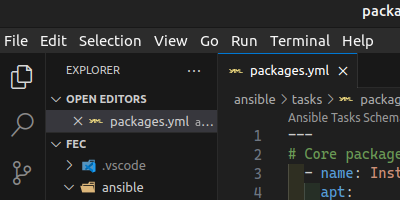
Visual Studio Code is a Microsoft-supported, cross platform text editor that moonlights as a light-weight integrated development environment with full git integration (amongst other things). VS Code has an extensive library of plug-ins and integrations that make it adaptable to just about any programming language you can imagine and support a littany of file formats. Take a look at the docs and learn pages for more information.
We'll walk through the editor interface in this talk, but you can reference the links above to revisit what is covered in the talk or a search on YouTube will return an ocean of results on VS Code. VS Code should have been installed if you used the provisioning scripts for this series as outlined on the setup page.
Now we'll install a few extensions to aid in our quest to program in Python with VS Code. Open the extensions tab (4 blocks, left navigation menu). Search for and install autopep8 (helps properly format Python code), indent-rainbow (helps you keep track of your indentation levels) and Python (an intellisense, linter and code completion tool). We may add to this list over time through follow-up lessons.
Quick tip: while nagivating in the terminal, if you enter code . you'll open VS Code in your current working directory. You can also pass a path if you aren't in the directory where your code lies by entering code /path/to/code.
There are also a large number of keyboard shortcuts. As you work with the editor more, it will be worth your while to add these shortcuts to memory as they can be real time savers.
part 3 - buzz, buzz
Our kits included 2 buzzers, an active buzzer and a passive buzzer.
Active buzzers are easier to use, and make sound at a single frequency when voltage is applied. The active buzzer has a water-sealed underside and contains more components.
Passive buzzers require more circuitry and components to function. You can manipulate the output of a passive buzzer via PWM (we used PWM in Lesson 02). We'll use a passive buzzer in our experiment below.
references
- CircuitPython PWM & Sound - Library Example (Adafruit Learn)
- Note frequencies
- Super Mario theme (if you dare!)
- Python code from Github
- Project Fritzing file
approach
- We'll use our Pico to drive a buzzer using Pulse Width Modulation (PWM)
parts
- Raspberry Pi Pico W
- Solderless breadboard
- 1 x passive buzzer
- hookup wires
- usb cable
wiring
Your passive buzzer is polarized. The indicators are on the underside of the buzzer next to the pins. There may also be a positive indicator on the top side of the buzzer. Be sure to connect it correctly!
NOTE: The buzzer represented in the Fritzing wiring diagram below is not consistent with how your buzzer will look.
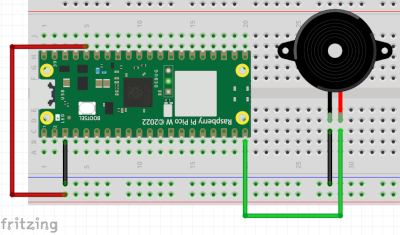
- Connect the 3V3 pin to a positive terminal on your breadboard
- Connect a ground pin to the negative terminal on your breadboard
- Connect the buzzer across a few rows of the breadboard, note your polarity
- Connect the negative leg of the buzzer to ground
- Connect the positive leg to GP15

code
# Import libraries
import board
import pwmio
import time

# Initialize a buzzer object via PWM
buzzer = pwmio.PWMOut(board.GP15, duty_cycle=0, frequency=440, variable_frequency=True)

# loop through notes pattern as designated by frequencies (f)
while True:
    for f in (262, 294, 330, 349, 392, 440, 494, 523):
        buzzer.frequency = f
        buzzer.duty_cycle = 65535 // 2 # On @ 50%
        time.sleep(0.25)
        buzzer.duty_cycle = 0 # Off
        time.sleep(0.25)
    time.sleep(0.5)
Have a favorite tune that you want to play? You can manipulate the frequencies to play different notes. Fancy a Super Mario theme? If so good luck to you. You'll be replacing the easy while loop above with specific timings and note frquencies, and your code.py will be much longer.
But do share if you give it a go!
A quick note on lists...
We used a list of values, in this case frequencies, to iterate in our for loop above. We could have easily passed the list of frequencies, as a list, into a variable then use the variable in the for loop to iterate through the frequencies. And lists are mutable, which means their values can change through program execution.
Here is what using a variable to hold the frequency values would look like:
frequencies = (262, 294, 330, 349, 392, 440, 494, 523)

for f in frequencies:
    ...
a quick variant, with a brief intro to functions
One key learning of programming is the notion of DRY - Don't Repeat Yourself. Whenever you see you are entering the same lines of code over and over again, like if we tried to more elegantly change the notes of our buzzer, you'd be entering the same code over and over again but just manipulating values here and there.
These are typically great opportunities to introduce functions so the code can be entered once, and when you call the function you pass in the values that change.
Consider the following code, as compared to that of the above version.
# Import libraries
import board
import pwmio
import time

# Initialize a buzzer object via PWM
buzzer = pwmio.PWMOut(board.GP15, duty_cycle=0,
                      frequency=440, variable_frequency=True)

# define a function to play sounds according to supplied values
def soundoff(f, st1, st2):
    buzzer.frequency = f
    buzzer.duty_cycle = 65535 // 2
    time.sleep(st1)
    buzzer.duty_cycle = 0
    time.sleep(st2)


frequencies = (523, 392, 329, 220, 246, 223, 220)

# loop through notes pattern as designated by frequencies (f)
while True:
    for f in frequencies:
        soundoff(f, 0.25, 0.12)
        print("frequency :" + str(f))
In this simplified instance, we are creating a function called soundoff (think military for the inspiration of that function name). When we call soundoff, we are passing a frequency, the duration of time that the note sounds, and the duration of time that the note is silent. This keeps us from having to rewrite a bunch of code to manipulate a song more elegantly.
This is just a simple illustration of coding more efficiently. The above code could be made even more efficinet to allow for better handling of the times passed in the function call as well. But the above should be enough to get your creative juices flowing.
homework
assignment 1
Please read Chapter 2: Variables, expressions and statements of Think Python 2 and practice the examples in IDLE or VS Code. Please also read Chapter 5, sections 5.1-5.7 on Conditionals as they will reinforce conditions and flow control. You can skip the recursion section as we'll come back to that later. Also take a look at the w3 Schools - Python Tutorials. These are handy, "byte"-sized topical tutorials on various aspects of the Python programming language. Also visit the Socratica: Python page. Both resources have been added to the resources page for future reference.
assignment 2
In addition to reading chapter two, you'll use what you've learned thus far to write a Python script that will execute on your computer via the CLI. Upon execution of the code, the program should prompt the user for their name and their age. The program should then respond to the user by name with a friendly greeting of your choice and remind them of the year in which they were born based on their age.
I encourage you to get creative with your Google searches and really pay attention to the errors Python will throw. They are rather informative at times, and others cryptic. But debugging code is always part of the process. Also make use of the print() function to validate your code is doing what you think it is doing at various stages. It is a helpful debugging tool. StackOverflow is a great resource, and when you Google search for Python + any other text, StackOverflow results are usually front and center.
Share your code and ask questions as needed!