lesson 05 - add a utility, more python and photoresistors
posted: Wed, Jul 12, 2023 |
tagged: projects | dev | electronics | fec
return to project home | resources
Quick References
- Github Repo
- Think Python 2 (free book)
- See the resources page for more
part 1 - tio
As we've experienced in this effort intermittent issues using Mu to connect to the connected microcontroller in random scenarios, we are going to add an additional utility into the mix to help give us a more consistent experience. To do this, we're going to install first Homebrew follwed by Tio. I have reference guides for both package installs: installing Homebrew and installing tio. Once both installs have completed, we'll continue on with the lesson.
Examples of using tio to connect to your microcontroller are in the install document. But for quick references, the following two commands will list available devices and connect to a specified device, accordingly.
tio -L
tio /path/to/device
part 2 - functions in python
In lesson 1 we used our first function, the print() function, to which we passed a string to be output to the console. Python has a number of built-in functions, and print() is one of the most common. But in Python, we can define our own functions to make our code more efficient and to keep from having to input the same logic over and over again when we want to perform the same process.
custom functions
Here is a basic function that will print out a few lines of text, we'll then invoke the function twice rather than repeating the three print statements each time we want to execute this code.
# defining a custom function in Python here to print output to the console
def printstuff():
    print("Here is one line of text.")
    print("Here is another line of text.")
    print("And one last one for good measure.")

# invoking the printstuff() function twice
printstuff()
printstuff()
You can try this in IDLE if you want, but let's get in the habbit of coding in VS Code. Open VS Code, create a new python file and try out the above.
Your terminal output should look something like this repeat the three lines twice in succession.
Arguably this function isn't particularly useful, but we aren't here to debate the merit (and probably shouldn't). So you may recall that in lesson 4 we made a revision to our basic code to leverage a custom function to streamline our playing of music notes through a buzzer. The modified code is repeated here:
# Import libraries
import board
import pwmio
import time

# Initialize a buzzer object via PWM
buzzer = pwmio.PWMOut(board.GP15, duty_cycle=0,
                      frequency=440, variable_frequency=True)

# define a function to play sounds according to supplied values
def soundoff(f, st1, st2):
    buzzer.frequency = f
    buzzer.duty_cycle = 65535 // 2
    time.sleep(st1)
    buzzer.duty_cycle = 0
    time.sleep(st2)


frequencies = (523, 392, 329, 220, 246, 223, 220)

# loop through notes pattern as designated by frequencies (f)
while True:
    for f in frequencies:
        soundoff(f, 0.25, 0.12)
        print("frequency :" + str(f))
By using the custom function, we didn't have to write the same code in the soundoff() function multiple times in our loop. We also used a variable as a list frequencies and iterated over that list passing values into the soundoff() function call that acted as variables within the function during each execution.
Given that functions typically are called with a format of function_name() - a name followed by parenthesis, we can pass values to that function in the parenthesis. The number of values we pass need to be accounted for within the function definition, as per the above where we start the function with the line def soundoff(f, st1, st2), which lets the Python interpreter know we're expecting 3 values to be passed with each call: f, st1 and st2.
returning values from functions
Functions can also return values should you need them to for use elsewhere in your code. You essentially set a variable equal to the function call, passing in any values necessary. And you return the value in your function with the return keyword. Here is a quick and dirty example:
def addvalues(value1, value2):
    summed_value = value1 + value2
    return summed_value

my_sum = addedvalues(12, 24)
print("The sum of 12 and 24 is: " + str(my_sum))
Much like the frequencies example from lesson 4, the custom function can allow us to call on this structured code multiple times throughout our programs whenever necessary. In the world of microcontrollers, this may be a function that pulls and manipulates values from a sensor for use elsewhere in your code. Or in the above example, we pass in frequencies and sleep times to streamline our code without a return value showing you other ways custom functions can be leveraged.
You'll use custom functions heavily in your code. Whenever you find yourself typing in the same lines of code in a different place in the same program, you should ask yourself if a function wouldn't serve you better. Remember the acronym DRY - don't repeat yourself!
Socratica: Python Functions: A quick supporting video on Python functions
part 3 - photoresistors, not blinded by the light
Our kits included a photoresistor (sometimes referred to as photocells). A photoresistor helps measure the amount of light picked registered at the sensor location. These can be useful in several different projects from gardening and hydroponics to robotics, home automation and more.
references
approach
- We'll use our Pico to take light readings from a photocell and manipulate a LED based on values read by the photocell
- Photocells are analog input devices
- The range of possible values will be between 0 and 65535
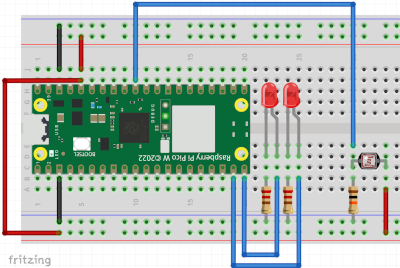
parts
- Raspberry Pi Pico W
- Solderless breadboard
- 1 x photoresistor (photocell)
- 2 x red LEDs
- 1 x 10k ohm resistor
- 2 x 220 ohm resistors
- hookup wires
- usb cable
wiring
For this lesson, I'm not going to be explicit about how you connect the two LEDs. Try to remember how this is done from memory. If you get stuck, refer back to lesson 1. Just know we'll use two different pins on the MCU for this. I'll continue to abstract away concepts we've already done multiple times to help support retention.
You can see the photocell in the image below, it is on the right side of the picture.
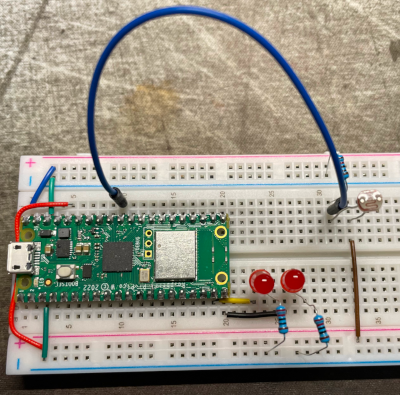
- Connect the 3V3 and ground pins to the breadboard rails (as before)
- Connect two red LEDs to open GPIO pins on the MCU and ground via resistors
- Connect the photocell across two open rows of your breadboard
- Connect one leg of the 10k ohm resistor to the same row as one leg of the photocell leaving an open space in the row, and connect the other leg of the 10k ohm resistor to ground
- Connect a jumper wire in the same row to an open analog in GPIO pin
- Connect the other leg of the photocell to 3v3
code
# Import libraries
import board
import analogio
import digitalio
import time

# Initialize our component objects
led1 = digitalio.DigitalInOut(board.GP14)
led2 = digitalio.DigitalInOut(board.GP15)
led1.direction = digitalio.Direction.OUTPUT
led2.direction = digitalio.Direction.OUTPUT
cell = analogio.AnalogIn(board.A0)

# let's loop a few times and read values while blocking some light
while True:
    print("Photocell value: " + str(cell.value))
    time.sleep(0.5)
As you save your file as code.py on your microcontroller, let's open up the terminal and connect to our device. Your output may differ from what is represented below
~ tio -L
/dev/serial/by-id/usb-Raspberry_Pi_Pico_W_E66164084377B82D-if00

~ tio /dev/serial/by-id/usb-Raspberry_Pi_Pico_W_E66164084377B82D-if00
You should be connected, you may need to break the logic with CTRL + C to interact with the board. But exit the REPL and let the code flow to see values presented to the console. Move your hand over the photocell at varying distances to obscure light and note the values displayed in your terminal.
Now let's rewrite our code to have a specific LED illuminate if the value is higher than a number we set based on something lower than the highest value output.
# Import libraries
import board
import analogio
import digitalio
import time

# Initialize our component objects
led1 = digitalio.DigitalInOut(board.GP14)
led2 = digitalio.DigitalInOut(board.GP15)
led1.direction = digitalio.Direction.OUTPUT
led2.direction = digitalio.Direction.OUTPUT
cell = analogio.AnalogIn(board.A0)

""" This is a multiline comment
 you may have to use different values for this variable depending
 upon how much ambient light you have and the readings you received
 in the test
"""
diff_value = 32000

# let's loop a few times and read values while blocking some light
while True:
    print("Photocell value: " + str(cell.value))
    if int(cell.value) > diff_value:
        led1.value = True
        led2.value = False
    else:
        led2.value = True
        led1.value = False
    time.sleep(0.5)
Save the updated code.py to your Pico and now move your had at various distances from the photocell noting the values output in the terminal. If you set an appropriate value based on the first iteration above for the variable diff_value, you should see the LEDs switch on and off depending on the amount of light reaching the photocell.
Note: Did you notice the progression of the two code examples above? First I wrote code to test and evaluate the photocell values. Then I expanded the functionality in example two. Programming should flow in this way, focusing on one piece at a time. If you try to tackle the entire project in one shot, you'll be debugging errors for hours/days. Start small, get one piece working, then expand. Crawl then Walk then Run
a quick note about human interfaces
It is important to note that LEDs are a great iindicator for the human interface to your projects. Often when we interact with electroncis, we expect to see a LED illuminate when the device is on, to blink when the device is busy working on something, and to indicate other types of status. This quick project was a direct reflection of that type of interface. And as mentioned above, it wouldn't be too difficult to have a photocell reading dictate when a home automation integration turned on a porch light.
what was with that multiline comment?
Python let's you provide for a block of commenting. That can be useful to "block" out an entire section of your code or to have your comments for your code span multiple lines. You can always preceed a line with a # symbol, or you can use the triple double quote (""") to control this.
homework
reading
Please read Chapter 6: Fruitful Functions of Think Python 2 and practice the examples at the end of the chapter to reinforce the above.
assignment
Let's build on what we've learned to-date and expand on the lesson 4 homework. You'll modify your program to evaluate the supplied age in a function and if the age is greater than or equal to 45, have the response remind them of the year in which they were born and let them know how wise they are. If the age is less than 45, remind them of the year in which they were born and compliment them for being so spry. Have all of the comparison logic and responses delivered inside the function, and then call the function passing in the age value. Don't worry about a return value unless you feel daring.
In lesson 3 we looked at if statements (and there is one above), and we just reviewed functions. So give it a shot! The Googs and StackOverflow are your friends here, so don't be afraid to do some clever searching and refer back to the Think Python 2 book.
Share your code and ask questions as needed!